Showing posts with label Gardening. Show all posts

Making Applesauce....Without Pain and Suffering

Friday, July 12, 2013


Back in the day when I was young and newly married, my husband's sweet parents would make homemade applesauce that they canned and then brought to us when they came to visit.  They had purchased local apples, and then one by one they had peeled, sliced, and cored every. single. one. and THEN cooked them on the stove top in a large pot with a little water in the bottom, taking special care to make sure it didn't scorch on the bottom.

So that is how I learned to do it, too.

And when I think about how many millions of lightyears easier it is for me to make applesauce now, I practically weep inside for that young, eager mother of little ones who spent many back-breaking hours peeling and coring.

If you are doing all that work to make applesauce, first:  YOU ROCK!  Second, STOP and READ THIS INSTEAD!  Your misery is almost over.

Thankfully, before too many years of hand-cramping applesauce-making misery went by, I learned about good tools for home food preservation.  The two that are essential to my applesauce making are these:

The Back to Basics Food Strainer makes peeling a coring a thing of the past!
This fabulous steamer means that I only have to wash my apples to prepare them for sauce and juice-making!


First, let me tell you about my steamer:

The bottom pan is filled with water.  This will be heated to boiling and produce steam.  Lots and lots of steam.  I try to remember to check the water level each time I finish taking steamed apples out of the top.  Otherwise your pan can go dry and get damaged, as happened to mine a long time ago.  Thankfully, this stainless steel set is extremely sturdy and continues to serve us well despite my mistake.


The next pan that nests inside of the bottom one allows the steam to rise up through the center cone.  This pan also collects beautiful juice!


The next layer is the colander.  Fruit goes in here.  The steam comes up through the holes and gently cooks the fruit without ever burning it.  The fruit bursts open and releases juice, which drips through the colander and is held in the lower juice reservoir.  Notice that the middle spot does not have holes in it.  This is so that you don't lose any juice that would fall down through that open cone spot below it.

Here are my washed apples filling the colander level to the tippy-top.  Although our apples weren't all perfectly beautiful this year, they had no bugs or worms, and so all I did was wash them and throw them in the pot.

Put the top on and let it roll!  I leave the burner on high so the water in the bottom boils continuously.

These apples had been steaming for about 20 minutes.  You can see that they are starting to burst.  While they could probably go through the food strainer at this point, letting them steam for a few more minutes will make it even easier.

After about 25 minutes or so the apples are super smooshy and easy to run through the food strainer.

I made a video to show you how the food strainer works, but technology ate it and won't let me upload it anywhere.  :(  I found someone else's video showing them using it so you can at least get an idea.  Below:


The Victorio Strainer in the above video is basically the same idea as the one I have, except mine is a little less expensive.  Nevertheless, the idea is that you put your fruit in the top funnel, turn the crank (easy and fun for kids to do), and out one side comes perfect applesauce, and out the other side comes peels and cores.  This works great for tomatoes, too!

For each full colander of apples that we steamed we got a little more than a full 9x13 pan of applesauce.  Since the apples we're working with right now are June apples, they are pretty sour, so the sauce needed to be sweetened.  This year I experimented with using Sweet Leaf Stevia, Coconut Sugar, and finally some nice local honey.  The honey ended up being our favorite, by far.  It was also less expensive than the Coconut Sugar.  I don't have a specific recipe to recommend to you for sweetening your applesauce.  It's really going to depend on your apples and how sweet you want your applesauce to be.  So just experiment little by little until you get a feel for how much honey (or other sweetener) you need to add to get it just right.
We also got some nice apple juice at the same time we were making the applesauce!  Here is a picture of some collected juice in the steamer.  Some little bits of apple do come through, so if you don't mind pulp, you can keep it, or if you do, you'll eventually want to strain off the pulp (and add it back into the applesauce) with a fine sieve.


You may have noticed that the juice reservoir has a tube running out the side of it.  Toward the end of the tube is a clamp.  When you're ready to get your apple juice, get out your glass jars, stick the hose in, and then squeeze the clamp to release the pressure on it and the juice will come out easily.  Again, because these were sour June apples, we choose to sweeten the juice with Sweet Leaf Stevia.  

To store your applesauce, you can choose to can it or freeze it.  I avoid using all plastic containers that have BPA in them.  #3, 6, and 7 are the worst.  Also, Tupperware has BPA in it so I avoid using that if possible.  You can freeze in glass jars if you leave an inch or more of head space.  There are some square and rectangular glass containers that can work well for this as well.  You can do some research about which plastic containers should be safe.  (I'm not going to bother linking to any because plastic safety seems to change all the time, so in an year from now who knows if the information I find today is still relevant.)

With the help of my food strainer and the steamer I was able to process a large laundry basket full of organic apples from our bad yard in less than 4 hours, including cleanup time.  That is time well-spent!

Have you ever made applesauce?  What tips would you want to share with us?

Harvesting from the Garden

Thursday, July 19, 2012

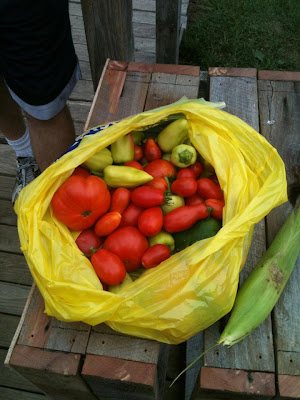
We are growing several varieties of organic heirloom tomatoes.  We have big beefsteak types, small Roma types, even some that are pink!  Also, banana peppers, green bell peppers, cucumbers, and of course tons of zucchini and summer squash still coming into the kitchen daily! 
We are also growing several varieties of organic heirloom sweet corn!  Since so much of today's corn supply is GMO, I no longer even buy corn from farm stands.  Instead, we grow our own.  It is fun to husk the ears and see which kind of corn was inside.  Some types have done quite well, others we would not have again next year.  The drought this month certainly has had an effect on the corn growth as well.


We still have a lot of zucchini and summer squash to use up.  Just about every day I am testing and tweaking recipes to use in my (quickly!) upcoming zucchini recipe ebook!  We have found some really good, new ways to use zucchini that are definitely more interesting than just making zucchini bread over and over again.  :)

For the corn, we will probably eat it every night for dinner until we're tired of doing so, and I'll be freezing the husked ears of corn whole, in gallon-size ziploc bags.  I don't even blanch them.  Just stick 'em in the bag and freeze.  Works just fine for us and we enjoy the corn throughout the rest of the year.

For the tomatoes and peppers, I'm thinking of canning homemade salsa this year.  For some reason I have never done this, even though I started canning probably 18 years ago and have canned tons of other things.  I am on the lookout for a good salsa recipe, so if you know of one, let me know!

People keep asking me how we kept the bugs off of our garden.  This is certainly our most successful organic garden yet.  I will admit that in other years we have just planted, let things grow, and if the bugs got to it, we didn't fight back.  The addition of the natural, homemade bug repellent that my husband used on our organic garden this summer has made a huge difference in the amount of bugs and quality of produce we've had.  For the most part, everything coming out of our garden looks really good and hasn't been buggy at all.  You can check it the recipe here.

Gardening, Huge Sale, and a Hot Offer! (and a very cute kid!)

Friday, June 29, 2012


It. Is. HOT. Here.

Is it hot where you are?

We have had over 100 degree temps here today, yesterday, and continuing for a few more days, they say.

Good thing that I have good garden workers like my youngest son!  He is 9 years old and he loves to help his dad with all of the planting, watering, weeding, and picking from our garden this year.  Our kitchen surfaces are generously covered with zucchini, summer squash, green beans, basil, peppers, and more.  With all of this hot weather, I suspect tomatoes will be in full-force within a week.  I have been testing out many recipes that use zucchini, in particular, in hopes of putting together a little zucchini recipe collection for you all.  Since our zukes seem to be coming on earlier than most other people that I am hearing from, I am hoping that I can find some award-winning recipes (Well, the Johns Taste Buds Award, anyhow!) into an ebook for you all.  I love how easily zucchini grows, but too often I have tried recipes that have not been all that good, and I feel like my ingredients have been wasted.  :(  Right now on the blog you can check out some of our favorites:

Zucchini Quinoa Patties
Chocolate Zucchini Cake (YES!)
Black Bean and Zucchini Taco Bake

My husband has handled all of the gardening this year.  He choose heirloom varieties and has been doing all the doin's organically.  You can read here about the essential oil concoction he put together to help keep the bugs away from our food.  :)

HUGE STEVIA SALE!  Due to changes in the marketplace that are SO good for you, the consumer, but not so favorable for me, the small business retailer  :), I have made the decision to liquidate all of my current inventory of Sweet Leaf Stevia.  You can read more about this decision here.  Please take advantage of these sale prices and stock up on all of your favorite flavors while they are available.  (Psst....know what else?  Read on to find out how to get FREE SHIPPING, too!)

FATHER'S DAY:  I dropped the ball.  You see, being a mere mortal mother that I am, sometimes things fall to the wayside.  Recently, I put together a Father's Day gift pack, and then never got around to telling you all about it.  :(  Sorry about that.  But fair is fair:  It's still up, and you can stock up on the gift packs through this weekend.  It's all good, no matter what day it is.  Right?  :)

Have you seen this thing on facebook where business and blog pages are mentioning that facebook has changed things up again, and now you won't see their posts unless you clickety-click something?  Yeah, well, I don't know how much truth to that there is, but I do notice that the stats I see are showing me that only 20-30% of you that have Liked the Supermom's Health and Wellness facebook page are actually getting to see the updates that I send out.  Every day or so I send out a recipe, link to an interesting article, ask questions, or do *something* that is related to healthy living.  If you haven't been getting those posts, would you click on over to the page, make sure it's "liked," and then also be sure that under the Like section you have checked "Show in News Feed."  Hopefully that will help.  And, hey--if it's all an urban legend, forgive me?  (I checked snopes.com and it isn't mentioned there....does that count as due dilligence?)

Since it is a hundred degrees out, I think we need a *hot* offer for you awesome people!  How about FREE SHIPPING on all orders of at least $100?  Great time to get your stevia, vitamins, and everything else you need!  This offer is good through the weekend.  (possibly longer, depending on how quickly I get back to changing the settings...)

Essential Oils for the Garden


Photo of my own personal organic gardener and husband of nearly 21 years, Dave Johns, our youngest son who at 9 years of age is the biggest gardening enthusiast of all of our children, and our faithful and sweet doggie Brandi.  :)

My wonderful husband Dave has been heading up a big garden for us this year.  We always garden without pesticides, but with mixed results.  (some years our plants get eaten up)  This year Dave did some research and decided to try out a combination of essential oils to help keep the bugs away.  It worked really, really well in our garden and in our fruit trees and grapevines, so now we'd like to tell you about it!


Just combine: 


16 drops tea tree oil
16 drops clove oil
 and 32 drops peppermint oil
with a gallon of water.


Dave used a gallon size sprayer to combine all of these items and spray the garden, trees, etc.  He learned that it wasn't really necessary to spray directly on the plants, but instead he generally sprayed the entire garden area.  He saw a dramatic reduction of bugs in the area, and our fruit trees are doing better than they have in years.


He mentioned that he hasn't seen any bugs dying from this spray.  We don't want to hurt bees, earthworms, or other beneficial garden friends.  (I don't even want to kill non-beneficial bugs!)  We just want to let the plants grow so we can eat them without sharing with buggy critters!  :)  Hopefully this mixture is just creating a less appealing spot for bugs to hang out, without hurting anybody.  We have had a bumper crop of zucchini, summer squash, banana peppers, kale, swiss chard, green beans, and bell peppers so far, and nothing tastes like essential oils, which was actually a concern of mine.


I hope this is helpful to you.  If you try it, let us know how it works for you.  OK?

Farmer's Market

Friday, June 26, 2009

Farmer's Market

Last Saturday was the opening day of our local Farmer's Market. This small town of ours hasn't had a Farmer's Market for about four years, so I was very thrilled to see it make a comeback. There were a lot of vendors, and I did my best to buy something from almost everybody. :) A bunch of beets for a dollar, new potatoes, zucchini, cucumbers, tomatoes, peaches, and organic meats were widely available. (and to think that I was worried that there wouldn't be very much available at this point in the season!)

I was thrilled to hear that several of the farmers left early because they had sold out!

I think that it is a win-win-win deal to do my shopping at the Farmer's Market as much as possible:

-I help support local businesses and build relationships in my community

-the market is closer than any store that I could go to

-everything is super fresh and therefore tastes better and is healthier

-I can find out specifics about how the items are grown and whether or not they are organic, etc. (did you know that many items are grown organically but are not labeled as such because the certification process is so costly for the farmer?)

-I get to see lots of my friends there!

-a lot of the time the Farmer's have other things available that they just didn't bring. By talking to them and getting to know about their operation you can often find resources for items that you would like to buy

-very often the prices are cheaper, and the quality is better!

-and if your car battery dies while your kids have the doors open for awhile as you shop and talk, you can even get a free battery-jump with purchase! (ask me how I know....)

Onions!

Thursday, June 25, 2009

Onions
The other day when my husband and I were outside we noticed our 89 year old neighbor was also out working in his garden, so we stopped by to say hello and visit with him. He gave us a little tour of what's growing, shared some of his vast gardening wisdom that he has gained from being a gardener for most of his life.

He showed us his l-o-n-g row of onions, and pulled a bunch, handing them off to us a few at a time, until my husband was holding quite a large bouquet of green-stemmed beauties. :) Tonite I washed them all and chopped them up in the food processor and put them in the freezer for later use. They smelled SO great! And it was fun to have our very first put-away-in-the-freezer produce of the season!

Gardening Blog

Sunday, April 26, 2009

Hey everybody!

For those of you that enjoy hearing about how things are working for other gardeners, you will probably enjoy checking out this one. The author is a daughter is one of my recent class members. She is gardening for her family! Check it out.

Earth Day Festival

Saturday, April 25, 2009

Today was such a gorgeous day here in Kentucky! It was comfortably warm, with lots of strong breezy winds. Wonderful for us to walk around and see the sights....but a lot less convenient for all of the vendors who had their tents and brochures flying about!

I was very happy to find vendors selling garden plants that were organic and heirloom. Heirloom plants allow for you to save the seeds and reuse them for future years, plus have the fun of sharing with friends. :)

Plants I bought today include:

several varieties of tomatoes (ah! Just the thought of the glorious scent of tomato plants has me looking forward to getting the tiller out!)
cucumbers
cabbage
cauliflower
broccoli
eggplant
lettuce (growing in my indoor window garden!)
basil (also growing indoors, along with some parsley I already had)
and probably a few more that I can't remember.

We were also able to buy some seeds. We're planning a large area for pumpkins, gourds, corn, watermelon, and some other melons. And of course I'm going to grow zucchini! (such an impressive plant!)

I am hoping that we can get all of these lovely plants into the ground very soon. I am really looking forward to growing lots of yummy things in my own back yard this year!

What will your garden grow this summer?

Planting Taters

Monday, March 30, 2009

Back "in the day" when I "only" had 2 or 3 children, we did big gardens. And then I had babies 4, 5, and 6 in under three years, and not only was I no longer gardening, but sometimes weeping or muttering unhappily when feeling obligated to pick grapes from our vines in order to not waste them. (Hey--YOU try picking grapes with babies and toddlers and preschoolers and other kids and post partum depression and sleep deprivation and see how you feel!)

Yeah, well, those days are gone, and over the past couple years I've tried to stick my toe back into the world of gardening. Last year my gardening accomplishment was a small patch of ground that featured about 4 tomato plants and 4 pepper plants. And, you know.....it was ok! I loooove the smell of tomato plants, don't you know. :)

This year I'm hoping and planning to have a bigger garden. I don't know how big it'll really end up being, but I have high hopes, that's for sure.

If nothing else, I do have a nice start on growing potatoes this year, which is something I've never done before. Probably because I do not like to dig in the dirt, nor dig my food from the dirt. Which is realize is a little ridiculous. Except that I guarantee that many people reading this are understanding and agreeing with me. :) I found out about a no-dig, no-dirt way to grow potatoes, and decided to give it a try. I thought you might enjoy a little photo tutorial on how we're going about it.

First, I picked a spot of our yard to have the potatoes. Last year it was used for compost (in a very non-official, lazy-gal's way of composting. ie: "Throw the compost in this spot. Maybe something good will happen.")

Next I went to the local hardware store and asked if they had seed potatoes.

"Yep." they kindly replied.

"What varieties do you have?" I asked.

"______ and ______" (two varieties that I was not familiar with, possibly because I am not familiar with hardly any varieties of potatoes, and realized that it was a little silly of me to ask once I had already done it)

"OK. Um....are either of those thin skinned varieties?"

To which both of the hardware store men looked at me seriously, then looked at each other. And then one said, "I think you just asked one question too many, because I have absolutely no idea."

Small town Kentucky. They're very helpful, but don't go all Martha Stewart on them.

"OK! No problem. I'll take four pounds of each!"

And they knew how to go from there.

I didn't really know how many potatoes to buy, but figured this would be good enough for a first time try. In lieu of keeping some sort of very organized gardening journal that I would no doubt misplace and lose before next year, I'll just mention the 4 pounds here, knowing that I can make my way back here for the information anytime I need it. (as it turned out, 4 pounds of seed potatoes covered a space of probably 6 x 12-18 feet. My husband thinks I am going to have a hard time even giving away this many potatoes. If so, it will make a great blog post!)

Now, I have heard of "seed potatoes" but didn't really know what the difference was between these and regular potatoes. And now I know. Seed potatoes are much, much dirtier than the potatoes I buy to eat. Other than that, they look pretty much like any neglected potato from my pantry. Some eyes, and some white shoots growing. No big deal.

Next year I'll just start saving my sad ole potatoes in the fridge and see how they work. (though the seed taters were only fifty cents at the hardware store, so I can hardly complain!)

Got my dirty seed potatoes home and proceeded to cut them up. The instructions I had said that bigger pieces were better, so I just halved the medium sized ones, and quartered the large ones, taking care to cut them in such a way that each piece had some eyes on it.

I took my pieces out to the yard and dropped them down in rows (roughly). I spaced them about 18 inches apart, and the rows maybe 3 feet wide. My husband guaranteed me that precision was not necessary. :)

After I got the taters down my handsome gardener/husband spread straw upon the entire area, about 6 inches thick. (This was straw we used to insulate an outdoor shelter for our doggie through the winter, so we get bonus points for recycling it, right?!)

See how nice it looks?

According to the instructions I had, if rain was expected soon, watering wasn't needed. We had rain the next day, so I didn't bother with the watering. Today it has been about a week and I peeked under the straw and it looks a little dry, so I may go water it sometime soon.

The idea with this system is that when the green potato plant shoots come up through the straw, you just put more straw on top of it. You keep doing that through the growing season, and at the end of the season you just pull the straw away and BEHOLD! there are the potatoes, ready to be picked up and taken to your table. Hot diggety dog, that's just the kind of thing I like!

I really hope it works. Some home grown, organic potatoes would sure be delightful. Don't you agree? :)